When you’re in the market for a reliable Internet Service Provider (ISP), the name Spectrum comes to mind. Previously known as Charter Communications, Spectrum has offered different services ever since the merger between Time Warner Cable and Bright House Networks. One of those services is internet connectivity.
To set up your Spectrum Wi-Fi router, you’ll need to connect the modem to the network. Once the connection’s been established, use an ethernet cable to couple the modem to the Spectrum router. Connect your desired device to the newly established network. Once all that’s done, finally activate your service.
Many people like doing their own work or you may not want other people in your home, especially in times such as now. For those of you, it’s best to have the proper knowledge of how to set up a Spectrum router.
What’s in Your Installation Kit?
The Spectrum router kit comes with its own guidelines. If you’ve decided to install the router yourself, it’s best to order the self-installation package. The self-installation package offers an installation kit that carries all the equipment you need for a DIY installation.
The self-install kit should have the following items in it:
- Wifi Router
- Modem
- Ethernet Cable
- Coaxial Cable
- Two (2) Power Cables
- Welcome Guide & Instructions
Once you’ve received the package, you need to ensure that the items mentioned above are in that package before jumping into the installation process. It’s better to start once you’re fully prepared instead of stopping in the middle of the process after realizing that something might be missing.
Spectrum Router Setup Guide
Once all the components have been accounted for, it’s time to move on to the central part - the installation process. Here are the simple steps you need to follow:

Step 01: Connect the Modem
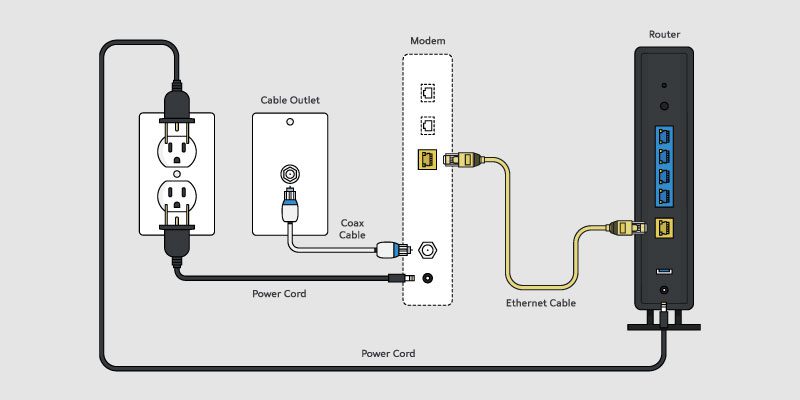
Pick up the coax cable and connect one end of the line to the outlet on the wall. Connect the other end of the cable to the modem. Use one of the two power cables to connect the modular device to a nearby power source.
You need to make sure that there’s a power source where you want to set up your modem. If you don’t find any power source in a convenient location, you can use a multiplug to set up your own hub.
After you plug in the modem, it’ll take about 2 to 5 minutes for the modem to connect to the network. You’ll see a blinking light in front of the modem.
Once the blinking light stabilizes, you’ll see that the connection is set up. Now, you’re ready to move on to the next step.
Step 02: Connect the Modem to the Router
Get the ethernet cable that came with the package. Connect one end of the line to the modem and the other end to the yellow-marked port of the Spectrum wifi router.
Now, you’ll need to turn on the wifi router. To do that, plug the power cord into the wifi router and connect the cable to an electrical outlet. As you plug in the power cord, you’ll notice a light on the front panel turn on.
This light signals the wifi status. Wait a few minutes for the wifi light to turn blue. This light means that the wifi router is successfully connected.
If the wifi light doesn’t come on, flip the ON/OFF button a few times, and you should be good to go.
Step 03: Connect Your Device to the Network
Once you’ve successfully connected the modem to the wifi router, you’ll be able to connect your device to the network to set up your account.
To do so, first, you’ll need to connect a device to the network. Since it’s the first time you’re setting up, the network will have a default name set by the router. You can find the SSID on the back of your router. You’ll also see the password there, which you’ll need to sign up for the network.
To connect your device to the network, go to wifi settings and look for your network’s name. Once you’ve located it, use the password given to you earlier to sign in. Make sure you change the network’s name and password for improved security.
To change the name and password of the network, first, you’ll need to log in with the default settings. Open your browser and put in the IP address, and then you’ll be prompted to the log-in page.
You can find the default log-in details on a sticker on the router. Use them to log in. Then you’ll be able to set a new name and password for your network.
After you’ve input the new settings, save your changes and exit. You can note down your new log-in details for convenience if you want.
Step 04: Activate the Modem
The Spectrum self-install kit offers the user two ways to start their service. You can choose to start your service on your own or activate your modem through a mobile phone or your computer. If you want to activate your service via smartphone, go to this website to activate your modem.
You can also start your service using your computer. To do that, visit this website, select Get Started, and follow the instructions. Once you’ve activated the modem, you can create a username here to manage your equipment and account.
What to do If the DIY setup fails?
The steps mentioned above are easy to follow and should yield a positive result. But you should always consider the possibility that some error may occur. So, in the case that even after following the instructions step by step, the self-install process fails, you can contact the Spectrum support service.
Spectrum offers a fantastic support service that will troubleshoot any problem you may have. However, note that the service is not free, and you’ll be charged. The troubleshooting team will look for the following issues.
- A fault with the used components, i.e., the wi-fi router, the modem, the used cables, and others
- The cause of the unsuccessful installation process
- Possible problems during the installation process
If the support team finds any fault with the equipment, they’ll replace the faulty equipment. They will not charge the customer for their troubleshooting service.
Professional Installation Vs. Self-Installation
When ordering your Spectrum internet service, you have two options to choose from. You can either go for the self-installation package or choose the pro-installation package. If you’re not comfortable with the possibility of troubleshooting the equipment, you can always opt for the pro-installation one.
A professional doing all the work will yield you a couple of benefits. First of all, you’ll need zero technical knowledge to get your network running. Secondly, and this is the best one, there’ll be someone on-site to see through things if anything goes wrong.
However, you’ll need to clear your schedule for the installation process, and the installation service isn’t free. You can set up an appointment and will have to remain home for the appointment window, which is approximately three hours.
There’s an option to receive reminders of your appointment. You can choose to receive your reminder via email, text, or phone. The notification will arrive a day before the meeting, confirming the exact time of the appointment.
So, you’ll need to ask yourself whether the convenience and cost reduction are worth the possibility of troubleshooting the components on your own. Or are you willing to pay a few extra bucks to see the process through smoothly? The choice is yours to make.
If you feel comfortable with the possibility of troubleshooting the equipment, should you need to, then it’s best to consider the self-installation option. But if you don’t feel comfortable doing so, you can always consider employing professional help to take care of the whole process.
Professional Installation Breakdown
- It will cost you USD 49.95
- Appointment window of up to three hours
- On-site technician will troubleshoot any issues
- No need for any technical knowledge on the customer’s part
Self-Installation Breakdown
- No extra charges
- Personalized installation timeline
- No on-site technical support
- Necessary to have basic technical knowledge
You may like to read: How to Set Up Wi-Fi in New Apartment?
Final Words
Available across 44 states, the Spectrum internet service is something to marvel at. While they have one of the cheapest professional installation packages, many people are now eager to know how to set up Spectrum router.
Due to the coronavirus outbreak, people are aware of strangers and tend to opt for the self-installation package for the safety of their families. Apart from that, many people are interested in DIY projects and love doing their own work.
While the self-installation process isn’t that difficult, it’s best to have a basic understanding of how the system works if you need to troubleshoot the equipment. Make sure that you have all the components you may need at hand and the ability to troubleshoot if the situation asks for it. If you can do that, the self-installation package may be the best option for you. And if you need any help, you can always use this article as a reference.


